

So you want to do something cool with all of this sports data that you’ve got. But you don’t know how to retrieve it from the database.
Over the course of the next couple of tutorials, we’ll go over how to use MySQL to grab data from the database and display it on the page. We’ll go over the basics of MySQL and how Sports Bench is already grabbing the data to give you a better understanding of how it all works. And by the end of it all, you should be ready to do cool things with your database.
So let’s get started!
What is MySQL?
So, to talk about MySQL, we first must define what SQL is. SQL stands for Structured Query Language, which is a programming language built to handle databases.
SQL allows you to easily manage databases. And if you don’t already know, a database is a collection of tables. Think a Microsoft Excel file that has multiple sheets with rows and columns. Each table has specific columns and you can add rows with data for each column.
As for MySQL, it’s just a version of SQL. Oracle, Microsoft and others have their own versions of SQL. MySQL is typically used for websites, and you’re likely using it for your website right now, whether you know it or not. You can use basically any SQL command with MySQL.
To access your site’s database, you’ll need to find either MySQL or phpMyAdmin on your host. If you’re using WPEngine, which I highly recommend, it should be on the left-hand menu on the install’s page. For other hosts, it’s likely in your CPanel.
So now that you’re in the database, let’s get to creating tables.
Creating a table
I should note that if you’re going to be following along during these tutorials, please do not do any of these SQL commands on your live site. Set up a testing site to give yourself a place to fail. The last thing you or I want to do is have your live site destroyed.
So anyway, creating a basic table is pretty simple. The syntax for table creation is as follows:
CREATE TABLE table_name (
 column_name column_type,
 column_name column_type,
 etc.
 PRIMARY KEY (column_name)
);
See, fairly simple. The first bit of information you need is the table name. Then you’re on to the columns. There you’ll need the column name and column name. The name can be basically anything. And, while the there’s a whole list of column types you could use, for affecting anything with Sports Bench, you’ll likely just need float, integer or text. After that you have a couple of options for the columns. You can make it impossible for the value to be null (either force it to be 0 or an empty string), and you can make it auto increment, which is valuable for the next item.
Once you’ve added the columns, you’ll need to set a primary key for the table. This is a column that each row will have a unique value for so that rows are easy to retrieve. Typically I create an id column, like team_id or game_id, which is not null and auto increments and set that as the primary key so that the rows are retrievable.
So with all of that in mind, here is the create table statement for teams from Sports Bench:
CREATE TABLE wp_sb_teams (
 team_id INTEGER NOT NULL AUTO_INCREMENT,
 team_name TEXT NOT NULL,
 team_location TEXT NOT NULL,
 team_nickname TEXT,
 team_abbreviation TEXT NOT NULL,
 team_active TEXT NOT NULL,
 team_location_line_one TEXT,
 team_location_line_two TEXT,
 team_city TEXT NOT NULL,
 team_state TEXT NOT NULL,
 team_location_country TEXT,
 team_location_zip_code TEXT,
 team_stadium TEXT NOT NULL,
 team_stadium_capacity INTEGER NOT NULL,
 team_head_coach TEXT NOT NULL,
 team_division INTEGER NOT NULL,
 team_primary_color TEXT NOT NULL,
 team_secondary_color TEXT NOT NULL,
 team_logo TEXT NOT NULL,
 team_photo TEXT NOT NULL,
 team_slug TEXT NOT NULL,
 PRIMARY KEY (team_id)
);
See, not that hard. So let’s start adding in the data.
Adding values
Okay, so we’ve created our first table. Now it’s time to add in a row or two to that table.
The statement for adding rows is fairly similar to creating tables. We’ll tell the database what table the data is going into, the rows where data is being added and then the data for the row.
INSERT INTO table_name (column_one, column_two) VALUES (value_one, value_two);
You can add multiple rows at once by enclosing each one in a set of parenthesis and placing a comma between them. And you’ll also need to make sure that the data you enter matches the data type allowed for each column.
So, if we’re going to add a couple of teams to the table, we’ll just do this:
INSERT INTO wp_sb_teams (team_name, team_location, team_nickname) VALUES ('FC Dallas', 'FC Dallas, ''), ('Portland Timbers', 'Portland', 'Timbers');
See, not that hard. Now you’re working a database. Let’s do something with this data.
Reading data
So we’ve create a table and added some rows. Now what’s next? Time to read that data.
Reading data is super simple … at least at first. The basic syntax to get data is as follows:
SELECT column_name(s) FROM table_name;
So first off, we tell the database what columns we want outputted and then we say what table we’re pulling the data from. Here’s how we’d pull the data we just entered:
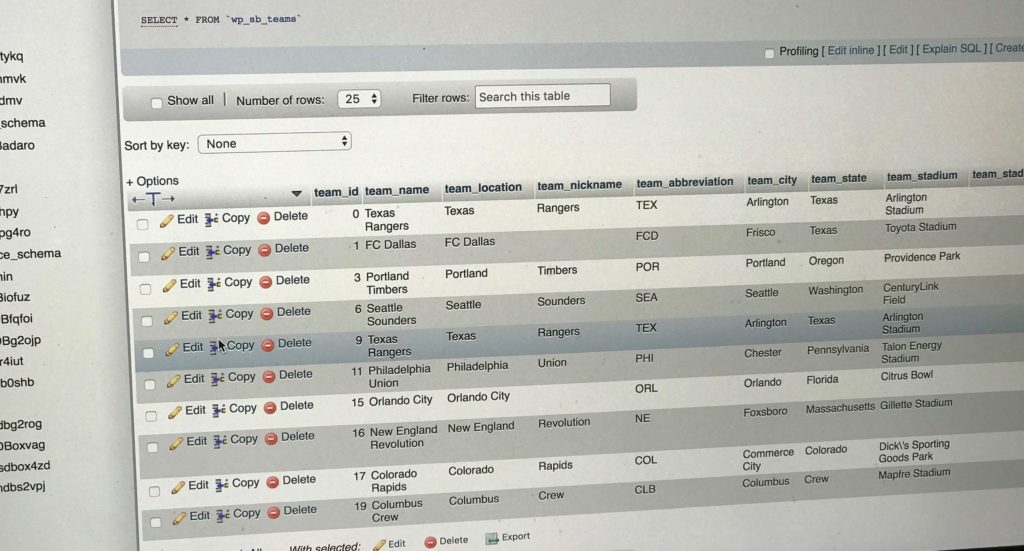
SELECT * FROM wp_sb_teams;
Okay, so I just threw a bit of a slider at you with the * character. That represents all columns in the table. So you would add that if you don’t care about specific tables. Now, what would that output on us?
| team_id | team_name | team_location | team_nickname |
| 1 | FC Dallas | FC Dallas | |
| 2 | Portland Timbers | Portland | Timbers |
Ta-da! We’ve got our data!
Now, what if wanted to limit our results? What if we wanted just FC Dallas to show? Well, that’s where the WHERE part comes into play. With this we just add it to the end of our SQL statement like so:
SELECT * FROM wp_sb_teams WHERE team_name LIKE 'FC DALLAS';
So our outputted table would look only include information about FC Dallas. I also want to note that when you’re searching for strings, you need to use LIKE. For integers and other numbers, you can use the tradition equal (=) sign.
You can also order the data and do other cool stuff with how it’s displayed. We’ll touch on that later, or you can check out W3Schools. Now let’s manipulate the data even more.
Updating rows
So now we’ve got the table, the data and can read the data. But, uh oh, one of the teams is moving. Portland is moving north to Seattle. So now we need to change the table to reflect this breaking development. With SQL, this is super easy.
UPDATE wp_sb_teams SET team_name = 'Seattle Timbers', team_location = 'Seattle' WHERE team_id = 2;
And that’s it. You just need to specify the table, tell which columns for the row are getting changed and what they are being changed to, and then which row is getting updated. Simple as that. And now I’ve managed to piss off Seattle and Portland soccer fans. Let’s move to erasing this abomination.
Deleting rows
Okay, so now that the citizens of Portland and Seattle are not happy with me, let’s erase the team and pretend it never happened. Fortunately, that’s easy to do in SQL as well.
DELETE FROM wp_sb_teams WHERE team_id = 2;
Now that team no longer exists. And now you’ve got the basics of SQL and MySQL down. Congrats! You’re becoming a database developer before your eyes. Keep up the good work!
What’s next?
Okay, so now you know how to create tables, add, update and delete rows, and how to read the data. In the next tutorial, we’ll learn how to specifically read the data in the Sports Bench tables so you can create cool things with your site.
MySQL Tutorials
- Using Sports Bench data with MySQL and PHP
- Getting players information with Sports Bench and MySQL
- Getting advanced player and team stats
- Getting more complicated player stats with MySQL and PHP
[sports-bench-other-posts category_slug=”tutorial”]


Leave a Reply